Showing posts with label Vegetarian. Show all posts

Sunday, May 19, 2013

Mmm... Sun Kissed Cheesecake (with the recipe)


My son loves cheesecake. He always orders it when we go out to eat. He asks me to buy some for him at the store. And I never do. And I feel guilty... 
I love my kids so much that I can't force myself to buy them a cheesecake (or anything else for this matter), that would hurt them with all those chemical and artificial ingredients that should be kept locked in a lab under biohasard warning sign. 


I love my kids and I want them to enjoy food, the real food. And if I have to walk an extra mile looking for real food I'd do it.


So I start with a trip to a local farm, that raises happy goats and chickens, and all other animals on pasture. When it comes to food, I am a control freak: I need to know where did it come from, how it was raised and produced. I was excited to learn that in our neck of the woods natural farming exists, and I was able to find eggs from free range chickens, raw goat's milk, grass fed beef, naturally raised pork. All of this just a short drive to the Cedar Creek Farm in Cedarville, AR. 


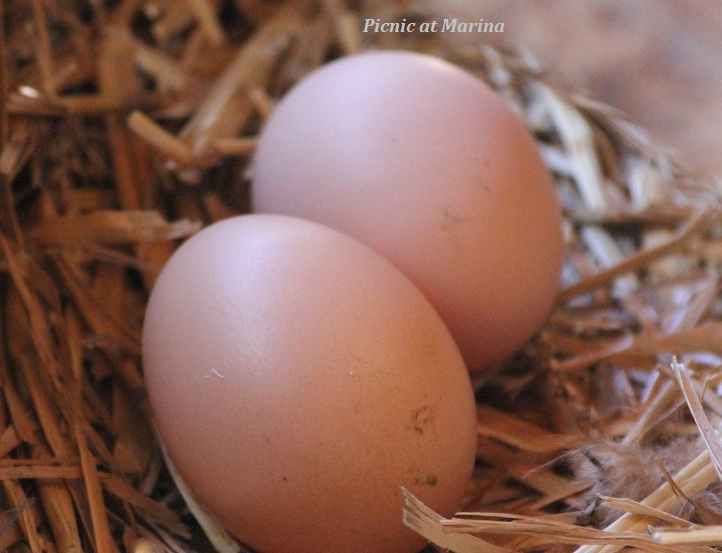
Eggs come from this chickens, that roam free on this beautiful pasture and have full access to their favorite food: bugs, grass, seeds, rocks... 


Milk for the cheese come from a friendly goats, that eat, play and rest on the sun all day long.


First, I have a glass of fresh raw milk. It's a meditation moment: I close my eyes and smell a meadow.   It puts a smile on my heart, and fills me with even more love. Love is an important ingredient to put in your food, or anything you create. And then I make a simple cottage (or farmer's) cheese for my cheesecake. 


***
Sun Kissed Cheesecake

Ingredients:

1/2 cup organic polenta (plus Tablespoon for dusting the baking dish)
2/3 cup milk
1 Tablespoon butter (and some for greasing the baking dish)

4 cups farmer's cheese (drained overnight cottage cheese can be used)
3 eggs
1/2 cup sugar 
1 Tablespoon sour cream, or buttermilk, or kefir
1 teaspoon good quality vanilla extract
1 Tablespoon Grand Marnier (optional)
pinch of salt (1/4 teaspoon)

1/2 cup raisins
1 cup boiling water


Directions:

1. Pour boiling water over the raisins and let it soak for 20-30 minutes.

2. Pour milk in a small sauce pan and bring it to a boil, stirring to prevent milk from scorching. Take off the heat and slowly add polenta, stir in the butter and mix well. Cover, and let it cool.


3. Pre-heat oven to 180C/ 360F.

4. Prepare an 8 or 9 inch spring form: lightly grease it with some butter, dust it with 1 Tablespon polenta, and tap to knock out the excess polenta.

4. Drain the raisins and pat dry it.

5. In a mixing bowl (or stand mixer if you have one) whisk together eggs and sugar. Add cheese, sour cream, Grand Marnier (if using), and vanilla, and beat well.

6. Add polenta mash, and mix until all well blended.


7. Stir in raisins. 

8. Place the thick batter into prepared spring form and with a spatula even the top. 


9. Bake the cheesecake for 45-50 minutes. 

It could be made in two small spring forms for a cute looking cakes

Cool cheesecake completely and serve with sour cream and strawberries, dusted lightly with sugar powder (whipped cream can be used instead of sour cream, but try with sour cream first, you'll be surprised!).

***


The recipe for cheesecake has been in our family for a very-very long time. And it was always made out of home made cottage cheese. Therefore I can't tell you what it would be if made out of store bought cheese. 
Making your own soft cheese is very easy, and I will make a post about it. For now, enjoy the cake! Sun kissed indeed. :)


See you,
Marina

P.S. This Thursday is our son's graduation from the High School. On Friday container should be here for packing. It looks like a busy week ahead. So... With all that said, my posts will be sporadic for the time being, until we move and settle somewhere. I also may not be visiting your lovely blogs as often as I'd like to.  But I think of you all often. Thank you for visiting my blog and leaving your touching comments! 


Wednesday, March 27, 2013

Kumquat Jam


One day at our local store a bright orange fruits caught my attention. I went by it once, than came back to the produce section to pick something else and looked at it again, then before I went to the register I came back to the produce section and couldn't resist to put in my basket a couple of kumquat packs. They were so sunny, so cheerful, and so happy looking at me, how could I had left without them?!


I came home, had a few kumquats with all their flavor bursting up to my brain. Then I had a few more, then... well, by the end of the day we finished it. Needless to say that the very next morning I went back to the store and headed straight to the section, where the little sunshine fruits were sitting. I bought a few more boxes with a single thought: "I need to preserve some of it". I didn't know how and what I was going to make, I just wanted a jar of this fantastic flavor to be preserved. 


And here it is, Kumquat Jam. I made it traditionally by pre-soaking sliced kumquats in sugar overnight, then adding some grapefruit juice and cooking for 30 minutes. The hardest part was to slice those tiny fruits into half moons. It took me just two hours to get it done. :) 


See you,
Marina

P.S. It looks like we will be moving back to Washington State in July. And we also have two graduations: our teenager is graduating from high school in May, and my husband is graduating from the residency in June. With all that said, my posts will be sporadic for the time being, until we move and settle somewhere. I also may not be visiting your lovely blogs as often as I'd like to.  But I think of you all often. 

Thursday, February 21, 2013

Mushroom Stuffed Eggs (for Chinese New Year)

Chinese New Year started on February 10th, so I am just a few days late with this post. My intention, a very good intention I must tell you, was to make this post upon our arrival to Seattle, illustrating it with some photos from celebration in China Town. And it didn't happened the way I planned. The closest I got to the celebration was this sign in the Bellevue Square Mall:


Because I already had this festive appetizer made, and also because I have two  snakes in my home (I meant two people born in the year of Snake: my daughter and my husband), I decided to go for it and post. Better late than never, right? :)

And what is the best food to welcome the Snake?

Mushroom stuffed eggs. 


Ingredients:


  • 10 hard boiled eggs
  • 2 portabello mushrooms, cleaned and cubed
  • 1 medium onion, peeled and chopped
  • 1 clove garlic, peeled
  • 1 Table spoon olive oil
  • 1/2 teaspoon dry dill (optional)
  • salt and pepper to taste


In a medium saute pan pre-heat olive oil, add onion, and saute until golden brown.
Add mushrooms, and cook on medium heat until all water evaporates, about 5 minutes, stirring frequently.
Cut eggs in half, remove from each half egg yolk.
In a food processor combine egg yolk, mushroom and onions, dill, garlic, and salt and pepper (start with a little pinch and taste). Pulse 2-3 times until all ingredients mix. Taste for salt and adjust if needed.
Carefully fill each egg white with filling and serve. 

Variation: use cooked chicken liver (my personal favorite) and follow the same direction. 


This appetizer is on top of 10 favorite appetizers:  easy to make, and everyone loves it. 
Although, now that I am thinking, I may not even have 10 on that list, but anyway it's on the top of however many are there. 


Happy Year of the Snake! May prosperity be with you!

See you,
Marina

Saturday, February 9, 2013

Cranberry and Quince Preserve


February is a month when I least think of preserving. Nevertheless, I made some cranberry preserve that lasted not longer than a week (can you even call it a preserve if it didn't have any time to actually go through all the stages to be a mature preserve?!)

A week ago, while I was doing my monthly shopping, I got stalked by  bags of cranberries. Yes, those bags kept looking at me when I added to my basket carrots, leeks, beets, cabbages, onions, greens. 
Each time I put something in the basket, cranberries would appear either before my eyes or in the corner of my eyes. 
When I reached for turnips, my hand somehow piked a bag of cranberries instead. 
"Oh, well, if you insist I might do something with you", was my thought, and I added another bag of cranberries to the basket. 
"Cranberries make a good winter drink, quick and easy, yet loaded with nutrients. It will make the teenager happy and help him fight his after practice thirst", I convinced myself.


Ingredients

I came home, washed the cranberries and set it aside, still deciding what to do with it. I rotated produce in my refrigerator (something I forced myself to do a few years back, and now doing it on autopilot: saves a lot of food, not to mention money), and found a lone quince. As soon as I looked at it, I smiled and my eyes lit with this spark of adventure: I know what I am going to do! 


Cranberry and Quince preserve (sauce)


Cranberry and Quince Preserve

Ingredients:


  • 2 (12oz each)  bags cranberries - 700 grams
  • 1,5 cups sugar 
  • 1 quince, cored and quartered
  • 2 cups water


In a blender or food processor blend together washed cranberries, quince, and water. If you don't have any of the mentioned equipment, just crash the cranberries with the potato masher. Cut quince into a small cubes with the knife.
Transfer all ingredients to a heavy-bottomed stainless steel or enameled cast iron 6+ Quarts pot.
Bring it to a boil, stirring a few times. 
Add sugar, reduce the heat to a medium and simmer for 10 minutes, stir well.
Turn off the stove, and let it rest (uncovered) until it cools down (2-3 hours at least).
Bring the mixture to a boil again, stirring frequently (to prevent scorching), reduce the heat to a medium and boil for another 10 minutes. 
Transfer hot preserve into a sterilized pint (500 ml) jar (s), leaving 1/2 inch from the top, wipe the rims of the jars with a clean damp cloth, close with sterilized lid. 
Let the jars cool completely (I usually leave it overnight), and refrigerate.
This preserve keeps up to 4 months in the refrigerator (if it stays that long. Not in my house though!)
If you process it by boiling the jars for 10 minutes, it will stay for up to a year (USDA has a resource)

Whether you like it with turkey on your sandwich, or as a dessert with your tea (my personal preference), this cranberry preserve (sauce) would be another homemade addition to your pantry. 
Two teaspoons dissolved in a cup of hot water will make a perfect cold remedy, loaded with vitamins and fiber. 


Cranberry drink


Have you ever been "stalked" by a fruit or vegetable on a  market? :)

See you,
Marina


Sunday, January 27, 2013

Mushroom Stock (Broth)


Cold winter days are perfect to stock up on some broths.  Every other weekend I make a fresh broth to use in cooking during a week and to freeze for later (for hot summer months when just thinking of turning on the oven makes me hot!). I prefer to make my stock during weekends, uninterrupted by pick ups, drop offs, and other school activities that sometimes come on a moment notice. 
For the stock I use portobello mushrooms as they have a little more flavor. 


Mushroom Stock (Broth)

Ingredients:

2-3 portobelo mushrooms, sliced
2 carrots, washed and pilled
1 leak, thoroughly washed white part, cut lenthwise in half
1 onion, sliced in half
1 celery root (you can use 2 celery stalks, just don't bake it, and add it with the seasoning), washed, pilled, and quartered
5 l (a little over a gallon ) water

Seasoning:
1 teaspoon dill seeds
1/2 teaspoon black peppercorn
1 bay leaf


Preheat the oven to 350F (175 C).

Prepare all ingredients (clean and cut), and place on oiled baking sheet. Roast until golden brown (about 25-30 minutes depending on your oven).

Transfer all roasted vegetables to a big pot, add water and bring it to a simmer (never let your broth reach a rapid boil point!). If there is any foam, skim it with a slotted spoon. 

Simmer for about 3 hours.

Add dill seeds and peppercorns and simmer for another 1-2 hours. Add bay leaf and simmer another 10 minutes. Cool, discard bay leaf, and refrigerate over night: let all the flavor develop and blend.

Next day strain the broth, bring it to a simmer for about 15 minutes. Now it's ready to be used in your favorite risotto, soup, sauce. Shelf life in the refrigerator 3 days. 
I also freeze it in a freezer safe  and labeled container (I personally like wide mouth jars) for up to 6 months. 

There's no salt in this broth as I prefer to control salt when I make a dish with it. However, from time to time I do add salt at the end and label it accordingly.  


Can you smell it?! :)

See you,
Marina


Thursday, January 17, 2013

Everything Roasted Warm Red Winter Wheat Berry Salad

Everything Roasted Warm Red Winter Wheat Berry Salad

This morning was cold, very cold, -7C (19F) cold... So I let myself  linger under a blanket for a few extra minutes before I rushed myself out of a bed. Then I had my traditional ritual "wake me up" dance (you know, the one when you move all your limbs in different directions), which this morning turned out to be a "warm me up dance". 
You know I am not a morning person, not at all. And my kids, bless their hearts, have been so kind to let me sleep just a little longer, like 2-3 minutes longer on a school day mornings. 
Today when I finally got out of the bed and came to the dining room, the teenager was doing the same "warm me up" dance. After a quick breakfast we left for the car, continue moving our limbs, almost performing a break dance on a parking lot. 
That's when I thought of something warm and comfortable for lunch, and Everything Roasted Warm Winter Wheat Berry Salad idea came to me. 
What else would you think of on a parking lot?! :)


Fennel


***
Everything Roasted Warm Red Winter Wheat Berry Salad

Ingredients:


  • 1 cup cooked red winter wheat (see notes)
  • 1/2 fennel bulb
  • 1 carrot
  • 1/2 red pepper
  • 1 turnip
  • 1 parsley root
  • 1/2 squash
  • 1 Tablespoon chia seeds
  • 1 teaspoon dried herbs mix (basil, oregano, rosemary, coriander, chives, marjoram)
  • 1 Tablespoon olive oil
  • 2-3 Tablespoons fresh flat leaf parsley, chopped
  • 2 Tablespoons lemon juice (freshly squeezed)

Vegetables 


Preheat the oven to 400F (200C).

Cut fennel, carrot, red pepper, turnip, parsley root and squash into wedges, place in a large bowl, add dried herbs and olive oil, and mix. 
Transfer all vegetables to a baking sheet, and bake 25-30 minutes.
Wash and dry the bowl. 
Mix roasted vegetables and cooked wheat berries with lemon juice and chopped parsley.
Sprinkle with chia seeds and serve.


Red Winter Wheat Berries

Notes:
1. Dry wheat berries take a long time to cook, about 2-3 hours. If you pre-soak it for 8-10 hours, the cooking time will be reduced 30 minutes. I usually pre-soak wheat berries from 10 to 24 hours, rinsing it a few times before cooking. Then I keep cooked wheat berries in the refrigerator and add to my soups, salads, breads, and etc. 
2. This recipe has no salt in the ingredient list as it doesn't need any: you have all that flavor from the dried herbs, enhanced by the heat, plus lemon juice and fresh parsley. However, if you wish to, you can add salt and pepper to taste.

***


Now, I am off to another dance, a happy belly dance!

See you,
Marina

Monday, December 3, 2012

Panini: Mozzarella Caprese, and Other Things...


Panini Mozzarella Caprese

There's nothing better for me than a warm cheesy panini on a December cool/cold hot day. Yes, you have it right: we have an area's record high temperatures for December: today it was over 80F (27C). I made kale chips last night, having oven on  for just 10 minutes, and we wanted to turn AC at night! 

Panini: Sauteed Eggplants 

Don't hate me, but the weather is just gorgeous. Not for cooking though. In the kitchen I have to make something really quick, panini quick. I've been making sandwiches every day with different ingredients. I love it all, however my all time favorite is Mozzarella Caprese. I can't just have enough of it. 

Ingredients for Mozzarella Caprese

NOTE: If you remember, a little over a month ago we (me and the teenager) were moving to Seattle. Yes, we did. But the job didn't work out for me, and we came back to Arkansas for the remaining seven months before my husband graduates from his medical residency. More on "why?" and "What happened?" I'll post some other time, when I am ready. The whole experience was extraordinary yet a bit tiring. We I drove over five thousand (5,230) miles, plus all the stress and decision making involved kept me pre-occupied for some time. 
We still moved to another apartment from our big townhouse. I miss my big kitchen...

Panini: Grilled Portobello Mushroom and Eggplant
with Mozzarella and Pecorino Romano cheeses with kale salad

Next seven months are our transitional time: the husband is looking for a job, getting his state license, teenager is working on his college application. 
Many things are going on at the same time, which fills our time from 6:30 AM to 10PM, and making the time to fly: I realized that I haven't posted in a week! 
Bare with me, and if you don't hear from me for too long, send me a note.:) 
I still have some photos and a few note worthy places to share from that road trip...

Sunset...


See you,
Marina

Monday, October 8, 2012

My Mother's Recipe: Stuffed Peppers

A sprig of  lovage on the top of stuffed peppers

After a week of traveling and eating out I am back to cooking. A home made meal, a cup of a warm soup on a chilly night and a few out of the oven peppers are a must upon our return. If we were coming to my parent's home, that's what my mother would have made for us. It's her signature "Welcome"  dish (see the second photo from the top on the linked page) for many-many guests in our home.


***
My Mother's Stuffed Peppers

Ingredients:
8-9 bell peppers, washed and seeds removed 
1 cup rice
1/2 cup barley
1/2 cup buckwheat
2-3 carrots, shredded
2 medium onions, chopped
1 cup smashed tomatoes, or tomato sauce
2 cups tomato juice
2 cups water or vegetable stock
1 teaspoon sugar
1 teaspoon dried dill
1 Tablespoon chopped fresh lovage
salt and pepper to taste
2-3 Tablespoons sunflower oil (or any other oil of your choice)

Gluten Free option: skip the barley and add a whole cup of buckwheat.

For Meat lovers: when mixing grains and tomato/carrots/onions mixture add 300 grams (a little over half a pound) grinded meat of your choice. Then you will need to adjust seasoning and use 3-4 more peppers.

Buckwheat


Pre-heat oven to 400F / 200C

1. Wash and pre-soak rice and buckwheat in hot water for 20-25 minutes.
2. Wash and pre-cook barley (bring it to a boil and simmer for 15 minutes).
3. On a high heat pre-heat oil in a large skillet, turn it to medium-high and add onions. Sprinkle with salt and stir for about 3-4 minute (until onions become translucent).
4. Add carrots, and stir for another 3 minutes.
5. Add 1 cup smashed tomatoes  and sugar, and let cook for another 5 minutes, stirring a few times (it may burn very quickly, don't leave the kitchen, stir!)
6. Drain all grains and combine in a large bowl.
7. Add the tomato/onion/carrot mixture to the grains and mix well.
8. Add 1 teaspoon salt and grind some pepper (about 1/2 teaspoon). Add chopped lovage, dill, and mix again.
9. Fill all peppers. To make it easier, I place peppers in the Dutch oven and then fill it.
10. Pour 2 cups tomato juice, 2 cups water (or vegetable stock), and a teaspoon of salt over stuffed peppers.
11. Cover and bake on the middle rack for 60-70 minutes.  Then take the lid off and check grains for doneness. It may need another 10-15 minute in the oven (depends what rice you use and how you oven bakes).
12. Serve stuffed peppers with some cooking juice and sour cream (optional).
***

Aroma of baked peppers perfumed my kitchen...
Can you smell it?


See you,
Marina

Thursday, September 27, 2012

Spicy Aubergine (Eggplant) Fries


Technically it's not a fries as it's baked in the oven with just a little oil to prevent eggplants from absorbing too much oil in it. 

Ingredients:
2 eggplants
2 tablespoons salt
2-3 rosemary sprigs, finely chopped
pinch of cayenne pepper
2 tbsp olive oil 
1 tsp granulated garlic

Cut eggplants lengthwise  into 1/2 inch  strips, mix with salt and set aside for 30 minutes. 
Preheat the oven to 450 F/230C.
Rinse  the eggplants under a running water to remove excess of salt, pat dry with the towel (or paper towel). 
In a large bowl combine olive oil, chopped rosemary, garlic and cayenne pepper and coat eggplants in the mixture by tossing it a few times. 
Transfer to a baking sheet and place on a middle rack in the oven. 
Bake 25-30 minutes, turning the baking sheet 180 degrees half way through the baking. 

Warning: highly addictive! :)

See you,
Marina


Thursday, August 16, 2012

Cheese Muffins


A few posts ago I teased you with some photos, and now it's time to share the recipe for those muffins many of your were so fond about. They are easy to make, and no stand mixer required. I personally do all mixing by hand. 


***
Cheese Muffins

Ingredients:

3 cups  (470 g) plain flour
1 Tablespoon baking powder
1 1/4 teaspoon salt
3 large eggs, beaten
2/3 cup (150 ml) olive oil
1 cup (250 ml) milk
1 cup (100-125 gr) shredded cheese (I used Swiss, Pecorino Romano, Feta, Mozzarella)
1 Tablespoon dried dill (optional)


1. Preheat oven to 375 F (190 C). Grease a 12 cup muffin pan with butter.

2. In a large bowl combine together the flour, salt, baking powder, and dill. Stir and set aside.

3. In another bowl , whisk the eggs, then add oil and milk and whisk again. 

4. Make a well in the middle of the dry mixture, add the egg mixture and shredded cheese (any cheese of your choice), and mix all ingredients. Do not overmix! 

5. Fill the cups with the batter, and level it with the rim.

6. Place in the middle rack in the oven, and bake 20-25 minutes.

When muffins are golden brown in color and springy to the touch, insert a toothpick in the center: it should come out clean. 

Cool it for 5 minutes (if you can), and enjoy with butter or raspberry jam. 

* This recipe was highly adapted from The WS Baking Book.

***


See you,
Marina